Living freely talks about, life,love,sports, joy, happiness, blogging tips and tricks. At the very best.

Facebook

Showing posts with label blogging tips. Show all posts

Tuesday, 7 March 2017

Easy Ways to Get Advertisers on Your Site

Easy Ways to Get Advertisers on Your Site


If you're just getting started on the internet--or simply looking for ways to add new revenue streams to your business--you might be considering accepting ads for other companies' products on your website.
Who wouldn't like to make a few extra bucks without any effort? You just put up a few ads on your site and wait for the cash to roll in, right?
Not necessarily.
To make your site attractive to companies looking for ad space, you'll need to have a great niche market, tons of traffic and the promise of good ad placement on your site. However, if you don't have all these elements in place yet, there are still ways for you to make money from ads on your site. The easiest--and often the most successful--include:
1. Promote an affiliate product on your site.
Joining another company's affiliate program is one of the simplest ways to get started with internet advertising. While affiliate links aren't technically ads, they allow you to make money by promoting someone else's product. As an affiliate, you earn a commission each time someone you've referred makes a purchase. To encourage sales, you might post a banner on your site that links to the affiliate site or publish a newsletter article about their product.
Different affiliate programs offer different payout options. Some might offer 10 percent commission for each sale, while others pay up to 50 percent of each sale. You'll want to shop around for the best deal for you and the best fit for your site. To find good affiliate programs, check out the following directories:

Some internet advertising pros are actually making all their income from signing on with multiple affiliate programs. They don't even have a product of their own! This isn't a strategy for beginners, however, so take some time to check out different programs before committing to this option.
2. Use targeted advertising with Google AdSense.
Google's AdSense program allows you to make money advertising on your site by placing targeted text ads generated by Google on your pages. The ads appear in rectangular boxes running down the side or across the bottom of a web page with the words "Ads by Google" over the top. These ads are paid for by businesses that use Google's pay-per-click program, AdWords. These ads reflect the content on your site, so if your site sells a book on how to recognize authentic baseball cards, for example, the ads that appear on your site might be for baseball card retailers.
As a Google AdSense publisher, you earn money every time a visitor to your site clicks on one of the AdWords ads on your site. If you're getting a lot of targeted traffic--and if these visitors are interested in the products being advertised--that could mean a healthy new source of extra income for you.
Best of all, Google AdSense is free to join. It's easy, too. Google does all the work of finding relevant ads for your site--you just collect the payments.
A word of warning: Google ads don't work for all sites, so if you add them, be sure to test them. You don't want to lose credibility with your target market.
3. Approach companies directly to ask if you can advertise for them.
If your site is already getting lots of traffic, try looking for sites that offer complementary products and target the same niche market as you do. For instance, if you own a bridal shop, you could approach a local florist to see if they'd like to advertise their wedding bouquets on your site. An ad on your site would also be seen as an implicit recommendation of their product, and it could send a ton of brides to their site. And the more successful your ads are, the more you can charge for them.
Be sure to contact potential internet advertising partners in a professional manner. Call them on the phone instead of just e-mailing them so your communication is more personal and professional. Be ready to supply them with information about your business and your site traffic. The more information you can give them, the more likely they'll be to consider your offer. And above all, make sure they have a solid reputation. If you partner with a questionable company, their activities could reflect poorly on your business.
4. Sign up for a blog-specific ad program.
If you have a blog, consider signing up to feature blog-specific ads on your site. The key is to consider the kinds of ads your target audience will find valuable. Here are some great ways to attract advertisers to your blog:
  • Sign up with a context-based ad program like Google's AdSense that will automatically generate ads for your site that you can put up within minutes of being accepted to their program. Crisp Ads offers a similar program, but only for blogs.
  • Place Amazon Associates ads on your site, and feature ads for products you personally use or are happy to endorse. That way, your customers are responding to your recommendations.
  • Get advertisers interested in your blog with a link they can use to contact you for rates and requirements. This link can be a simple message saying "Click here to find out how to advertise on this blog!" That way, anyone visiting your site is free to discuss advertising opportunities with you.
  • Sign up with an advertiser-publisher connection program like BlogAds or AdBrite, and get listed in their publishers' directory. One important note: With these types of ads, the advertisers look through listings of thousands of blogs to choose the right people to promote their products. Unless you're getting thousands of visitors a day, they might not be all that interested in doing business with you.
Making money from your site isn't a matter of putting up a few ads and grabbing a paycheck--it takes a lot of research and testing on an already established site to make even the best internet advertising strategies truly pay off.
Even then, you may find that your audience resists the presence of ads. If you're putting people off by placing ads on your pages, you could end up losing more customers and revenue than you actually gain. To make sure this doesn't happen, test every aspect of each new ad campaign you run.
Once you do discover the internet advertising strategies that work best for your site, you can try promoting another product, and then another. Soon, all those added revenue streams will combine to swell your profits.

Saturday, 28 January 2017

STEPS TO INCREASE YOUR ADSENCE EARNING


As a blogger, finding ways to monetize your blog is usually a top priority. Of course, blogging can be a pastime that you enjoy and do for fun; however, earning extra money is never a bad thing. During your quest to earn more from your blog, you’ve probably dabbled with Google AdSense. You’ve generated the ad units, placed them on your site… and watched the profits trickle in.
Yes, Google AdSense is simple and easy to use. However, like any program, there’s room for improvement. In fact, there are simple optimizations that you can start today to increase your AdSense earnings by earning more clicks and optimizing so your ads are more eye-catching.


Warnings before you start using adsence
Like any other program, Google AdSense has strict guidelines pertaining to certain actions. Knowing these from the beginning can save trouble later on.
Behaviors Prohibited By Google Adsense Include:
Tricking viewers into clicking on your ads – placing images next to ads, offering compensation for searches or for clicks and so on.

Telling people to click on your ads – writing about the ad in the text and asking readers to click, using any “Click Here” language or imagery next to an AdSense ad and other methods.

Clicking on your own ads.
Traffic sources must be valid – publishers cannot participate in “paid-to-click” programs to drive traffic.

It’s critical to become familiar with AdSense’s guidelines before you start to understand the limits that exist. In certain situations, breaking the rules is grounds for a lifetime ban from the program;
this is obviously the last thing you want!
Also important to note is the idea that what works for one blogger might not work for you. It’s great to read success stories and tips on how to succeed, but how those steps play out on your on blog cannot be predicted in advance. Take the time to monitor your activity on a regular basis and to track what’s working and what’s not. Experiment with different optimizations until you find the right combination for your blog.

 Like any revenue-earning endeavor, making AdSense work for you will take time; however, in the end it will be well worth the effort.

Once you understand these ideas, you’re ready to get started.

 Check out the following strategies for increasing your AdSense earnings, starting today.
1. Experiment With Ad Sizes
According to Google, wider ads tend to perform better than tall ads; they are more reader-friendly because of the fact that they allow readers to read more without having to skip lines as frequently. Wider ads lead to a more consistent reading pattern and, therefore, a higher click rate.

The sizes found to be most effective by Google are the 160×600 wide skyscraper, the 336×280 large rectangle, the 300×250 medium rectangle and the 728×90 leaderboard. But to see how using these plays out, there’s no better place to look than the sorts of viral websites you see popping up in your Facebook feed, such as IFLScience, shown above. These sites experiment regularly with ad placements and sizes, trying something new on a regular basis. This leads to a higher potential click-through rate over time. Take a look at your blog to find out where you could incorporate a wide ad and start there.

2. Place Your Ads Where They Are Most Likely To Be Seen and Clicked
When are ads most likely to attract attention? When they are near something that a user is likely to click on anyway. User’s eyes follow the mouse or the finger. When one of your readers is going to click on something anyway, an ad near that location is likely to draw their attention.
Where do your users click? On social buttons? On share buttons? On your navigation? These would all be ideal locations for AdSense ads. Viral Nova is one site taking advantage of location by placing ads below their navigation and social buttons. Because they have an active social following, they understand that these ads are more likely to draw attention than something hidden further down the page. Placing lacing ads above the fold eliminates the possibility of losing clicks simply because users never scroll down. Up top and near something likely to be clicked is best.

3. Remember: Solid Content Boosts Advertising Potential
If the content you create doesn’t attract visitors, the best ad placement and size in the world won’t make a difference. Personal blogs about family life don’t attract advertisers. Who are you trying to reach? What interests them? What stories or information do you have to share?
If you’re able to sustain an audience around a shared interest – such as cooking, like The Kitchn, or classic cars, like CJ Pony Parts – your ads will benefit from the continuity. Google AdSense ads are contextual , which means that Google’s robots skim your content to determine what it’s about, and then place ads that suit that theme. If your blog follows a consistent theme, and you build an audience around that topic, your ads are more likely to be relevant to your readers. This makes them more likely to click, and you more likely to earn more money from your audience.
As you can see in the screenshot of TheKitchn above, their ads are contextual – one is for blenders and the other is for recipe recommendations. This is super relevant to their typical audience, and also relevant to me. (I spend WAY too much time reading food blogs.)
By the way, that “half page” ad size is one that Google describes as “one of the fastest growing sizes by impressions,” and it appeals to publishers who want to visually stun their audience.

4. Make Sure Your Ads’ Design Meshes With Your Site While Standing Out
It sounds counterintuitive. However, an ad should mesh with the overall theme of your blog. Something that feels unnatural or that overly sticks out will get glossed over because of ad blindness. At the same time, ads should stand out enough to get noticed.
Look for ways to blend the borders of your ads with the background of your page and to use complementary colors to your advantage. PaleOMG does a great job integrating their ads by using ad text colors that matches the blog’s text and even using a similar font to the one used in the ad. Look at the research that’s been done and experiment on your own blog.

5. Pick a Theme That Is Designed for Adsense
Certain WordPress themes are designed specifically to optimize potential AdSense earnings. These templates take the guessw
ork out of AdSense and provide for serious potential from the start. Based around research, sites like Cleverpedia use themes designed to enhance AdSense earnings. If well-known sites with high traffic use AdSense-optimized templates, there’s no reason that you shouldn’t as well.
AdSense doesn’t have to be a puzzle that’s impossible to put together. Start with a little research and put the steps above into action today. Don’t be afraid to mix it up and try something new when you’re not seeing results. Over time, your earnings will increase and your AdSense experience will be a successful, revenue-generating endeavor

Thursday, 24 November 2016

HOW TO START BLOGGING WITH WORDPRESS

DON'T WANT TO USE BLOGGER! TRY WORDPRESS

What do you need to start a WordPress blog?

There are three things you need to start a WordPress blog:
  1. A domain name idea (this will be the name of your blog i.e wpbeginner.com)
  2. A web hosting account (this is where your website live on the internet)
  3. Your undivided attention for 30 minutes.
Yes, you read it right. You can start a blog from scratch in less than 30 minutes, and we will walk you through the whole process, step by step.
In this tutorial, we will cover:
  • How to Register a Domain Name for Free
  • How to Choose the Best Web Hosting
  • How to Install WordPress
  • How to Change Your Theme
  • How to Write Your First Blog Post
  • How to Customize WordPress with Plugins
  • Resources to Learn WordPress
Ready? Let’s get started.

Step 1. Setup

The biggest mistake beginners make when starting a blog is choosing the wrong blogging platform. Thankfully you’re here, so you won’t be making that mistake.
For 95% of users, it makes more sense to use WordPress.org also known as self-hosted WordPress. Why? Because it is free to use, you can install plugins, customize your site design, and most importantly make money from your site without any restrictions (see the difference between WordPress.com vs WordPress.org).
Now you have probably heard that WordPress is free.
You might be wondering why is it free? What’s the catch?
There’s no catch. It’s free because you have to do the setup and host it yourself.
In other words, you need a domain name and web hosting.
A domain name is what people type to get to your website. It’s your website’s address on the internet. Think google.com or wpbeginner.com
Web hosting is where your website live. It’s your website’s house on the internet. Every website needs web hosting.
A domain name typically costs $14.99 / year, and web hosting normally costs $7.99 / month.
That’s a lot for beginners who are just starting out.
Thankfully, Bluehost, an official WordPress recommended hosting provider, has agreed to offer our users a free domain name and over 60% off on web hosting.
Bluehost is one of the oldest web hosting companies, started in 1996 (that’s before Google). They are also the largest brand name when it comes to WordPress hosting because they host millions of websites including our own.
On top of all this, Bluehost has been working with WordPress since 2005, and they are committed to giving back. That’s why they have promised us that if you cannot get your blog online within 30 minutes by following this tutorial, then our expert team will complete the process for you without any cost. They will compensate us, so you don’t have to. Contact us for free blog setup help.
NOTE: At WPBeginner we believe in transparency. If you sign up with Bluehost using our referral link, we will earn a small commission at no extra cost to you (in fact, you will save money and get a free domain). We would get this commission for recommending just about any WordPress hosting company, but we only recommend products that we use personally use and believe will add value to our readers.
Let’s go ahead and purchase your domain + hosting.
Open up Bluehost in a new window and follow along.
First thing you need to do is click on the green Get Started Now button to get started.
Start with Bluehost
On the next screen, select the plan that you need (basic and plus are the most popular).
After that, you will be asked to enter the domain name for your website.
Select your Domain Name
Lastly, you will need to add your account information and finalize the package info to complete the process. On this screen, you will see optional extras that you can purchase. It’s entirely up to you whether or not you purchase these, but we generally don’t recommend purchasing these. You can always add them later on, if you decide that you need them.
Hosting Checkout
Once completed, you will receive an email with details on how to login to your web hosting control panel (cPanel). This is where you manage everything from support, emails, among other things. But most importantly, this is where you install WordPress.

Step 2. Install WordPress

In the cPanel, you will see dozens of small icons for different services and features. This can be a bit overwhelming, so ignore 95% of them because you will never need to use them.
Scroll down to the website section and click on the WordPress icon.
cPanel Install WordPress
You will be redirected to the Bluehost Marketplace Quick Install screen for WordPress. Click on the Get Started button.
On the next screen, you will be asked to select your domain name. Choose the domain from the dropdown and then click Next.
Enter your Domain Name - WordPress Setup
After that, you need to enter your Site Name, username, and a password for your site. You also need to check all the checkboxes and then click Install.
Install WordPress - Bluehost Marketplace
The QuickInstall will start installing WordPress. The marketplace will prompt you to browse WordPress themes, while WordPress is being installed.
No need to do that right now. We’ll show you how to get free WordPress themes in the next step.
Once WordPress is finished installing, you will see the success notice in the top header bar.
Bluehost WordPress Install Complete
Click on the Installation Complete link, and it will take you to the screen with your WordPress login URL and password.
Bluehost Marketplace - WordPress login details
Congratulations, you have created your WordPress site. That wasn’t too bad right.
Your WordPress login URL will look like this:
http://yoursite.com/wp-admin
Click on the WordPress login link to login to your dashboard.
Now we’re ready to customize your site’s appearance and start blogging.

Step 3. Selecting your WordPress Theme

The visual appearance of your WordPress blog is controlled by themes. When you first visit your blog, it will look something like this:
Default WordPress Theme
This is not very appealing to most people.
Customizing the look and feel of your blog is by far one of the most exciting and rewarding part in the journey of creating your WordPress site.
There are thousands of pre-made WordPress themes that you can install on your site. Some of them are free, while others are paid.
You can change your theme by going to your WordPress dashboard and clicking on Appearance » Themes.
Install WordPress Themes
Go ahead and click on the Add New button.
On the next screen, you will able to search from the 4100 free WordPress themes that are available in the official WordPress.org themes directory. You can sort by popular, latest, featured, as well as other feature filters (i.e industry, layout, etc).
Select a Theme
When you have found the theme that you like, simply bring your mouse on it, and it will show the Install button. Click on it and wait for the theme to be installed. After that, the install button will be replaced with an Activate button. You need to click on it to Activate the theme.
Install and Activate WordPress Theme
Once you have installed your theme, you can customize it by clicking on the Customize link under the Appearance menu.
If you need help selecting a theme, then please refer to our guide on 9 things you should consider when selecting a perfect WordPress theme.
Once you have selected your WordPress theme, you are now ready to create your first blog post.

Step 4. Creating Your First Blog Post

To write your first blog post, click on the Posts » Add New menu in your WordPress dashboard.
You will see an editor area where you can write your first blog post.
WordPress Blog Post Editor
Once you’re done writing, go ahead and click on the Publish button on the right to publish your first blog post to the world.
Publish Button
On the posts screen, you will notice several other sections such as Categories and Tags. You can use these to organize your blog posts. We have a great writeup on the difference between categories vs tags, which we highly recommend that you read.
To utilize all the features on the posts screen, you should read our article on how to add a new post in WordPress (video included).
Often beginners are confused between posts and pages menu in the WordPress dashboard. That’s why we have written a complete guide on the difference between posts vs pages in WordPress.

Step 5. Plugins & Customizations

Once you have written your first blog post, you probably want to get started with adding other usual elements on your website such as a contact form, about page, and more.
To further customize WordPress and add features like contact forms, galleries, sliders, etc, you need to use WordPress plugins.
WordPress plugins are apps that allow you to add new features to your website.
There are over 46,000 WordPress plugins available. At WPBeginner, we feature the best WordPress plugins to help you add the functionality that you need.
We have a step by step guide on how to install a WordPress plugin.
Often readers ask us which plugins do you use on your website. You can check out our Blueprint to see the list of plugins and tools that we use.

Step 6. Mastering WordPress

Business Learning and Support
WPBeginner is the largest free WordPress resource site for beginners.
At WPBeginner, our main goal is to provide cutting-edge helpful WordPress tutorials that are easy to understand for small businesses, bloggers, and non-techy WordPress website owners (see more about us).
To expand your WordPress knowledge, you should check out:
  • WPBeginner Dictionary – The best place for beginners to start and familiarize themselves with the WordPress lingo
  • WPBeginner Videos – New to WordPress? Watch these 23 videos to master WordPress.
  • WPBeginner Blog – The central place for all our WordPress tutorials.
You can also subscribe to WPBeginner’s YouTube Channel where we regularly share video tutorials to help you learn WordPress.
Lastly, you can use Google to type your question and add WPBeginner in front of it. Our users find this very helpful because you’ll likely find an answer to any WordPress questions that you have.
In case you don’t find an answer to your question, simply use our contact form to send us a message. We love helping users get started with WordPress.
We hope that you found our tutorial on how to start a WordPress blog to be helpful. You may also want to check out our article on 19 actionable tips to drive traffic to your new WordPress site.

Wednesday, 23 November 2016

HOW TO PERMANENTLY DELETE YOUR BLOG

Blogger is one of the most popular blogging platforms that allows you to create your own blog for free without any charges.


You don’t have to worry about hosting, technical stuff or anything like that. That’s why many people jump over to blogger to start their first blog and that’s absolutely fine.
However, at some point, you realize that you no longer want to maintain it and want to delete your old blogger blog account.
There could be many reasons, you made the mistake with your first blog, you did everything wrong or whatever the reason may be.
So how can you permanently delete your blogger blog or account? This post is going to give you a step by step guide to delete a blogger blog. I also added answers to some most frequently asked questions about deleting a blogger account or a blog to remove any doubts you have.
Warning: Deleting your blog will remove everything including posts and pages.

How to delete a blogger blog permanently?

Step 1: Login to your blogger account using your Gmail.
choose your blogger blgo
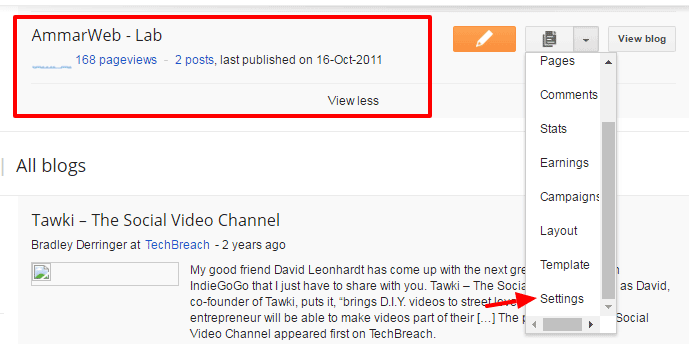
Step 2: Choose the blog that you want to delete and click the down arrow button as shown in picture.
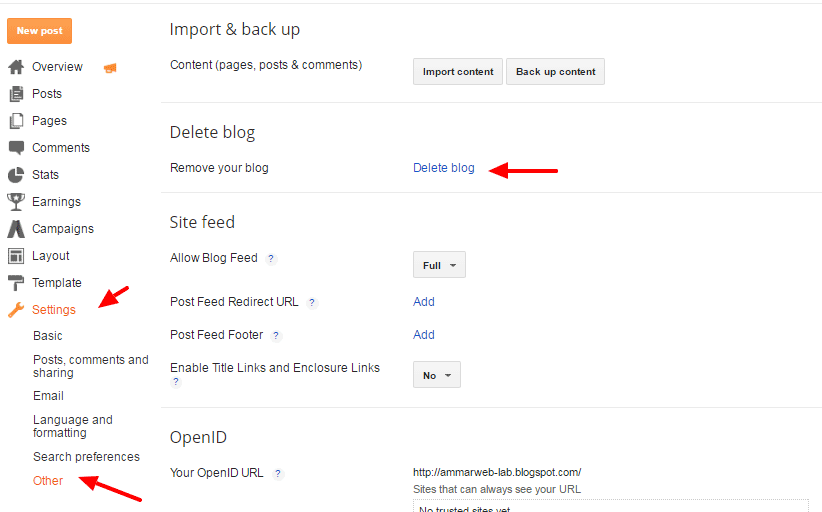
Step 3: Click on setting button and choose “Other” located at the left side.
click setting to delete your blog
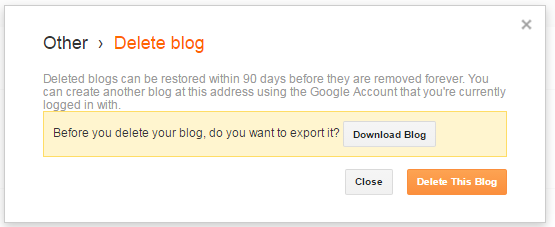
Step 5: Click on “delete blog” and this window will pop up.
Step 6: It’s highly recommended download your blog first just in case you decide to move back. Once you’re done click on “Delete this blog”
last step to delete blogger blog
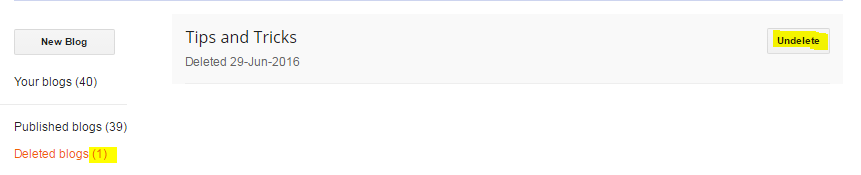
Now your blogger blog will be deleted. Here’s what you’ll get in your blogger homepage.
undelete blog option
You’ll find the list of all your deleted blog over there. You will have 90 days to restore your blog and if you don’t do that it will be removed completely.

Frequently asked questions

Here are some of the most frequently asked questions that I come across on different forums so I decided to write all of them over here to help you out.
Q: How to delete my blogger account permanently after deleting my blog?
You can’t. You need to understand that your blogger account is associated with the Google account and Gmail. You just can’t separate blogger from Google account. Hence, a blogger account can’t be deleted without deleting your gmail account.
If you still want to delete your blogger account permanently simply close your Google account but be careful before taking this final decision.
Q: How to delete blogger blog without logging in?
First thing would be to recover your account if possible. If you don’t remember password then recover your email address from Google accounts.
If nothing works, simply submit the request to Google and they’ll verify if you are the sole owner of the blog and will solve your issue.
Q: How can I delete my blog when I don’t remember my email or can’t log in? 
If you created a blog with an old unknown email and you forgot it. There is no way to gain access to your get blog back. Unfortunately, blogger support does not help in solving ownership issues.

Conclusion

Deleting a blogger blog is easier than you think. However, things might get worse when you forget login details or have no access to your Gmail account.
What was the last time you deleted your blogger blog? Was it easy? Is there’s anything I missed in this post, feel free to let me know in comments.

Steps to Write a Money-Making Blog Post Every Week

Blogging has gone beyond writing a 500+ word post. Way more!   make money online
Every blog post you write should bring you profit.
The profit could be anything worthwhile – fresh readers, repeat readers, authority, sales, improved rankings and clients.
I want to quickly show you how to write a blog post that generates income for you every week.
It doesn’t matter how much you’ve struggled to achieve this goal in your business – just believe it’s possible. And every business failure will be gone.
Now, it all depends on how much you really want to make, and how consistent you want it to be.
I started blogging in 2011. Honestly, I feel like spanking myself right now due to the childish mistakes I made at the time.
Writing a post has never been difficult for me, but getting that post to generate money was my greatest nightmare.
As a blogger, you can’t build a business empire without money. In fact, it’d be silly to say that money is secondary. I believe it’s core. If you think otherwise, leave a comment.
Money is the pivot, by which every other success is hinged.
Specifically, here are 7 smart steps to write a post that will bring in the money:

Step #1: Write down your objective

You can’t get ahead in your blogging if you don’t know why you started in the first place. You see, your objective is the ‘reason why.’
Prior to 2011 when I started my first blog, I had been actively doing affiliate marketing.
Yes, I made some serious money with clickbank, but I realized that connecting with industry experts and building my own community could be easier with a blog.
And I was right. From that moment, I wrote down my objective. I wanted to establish authority, attract paying clients and best of all – make at least $3,000/month. Of course, there were months I didn’t win, but it’s okay – bloggers don’t win all the time.
Failure is part of winning. Don’t imagine or dream of it, you’ve to write it down. That’s where the power to move with speed lies.

Step #2: Build resourceful landing pages

Before you can write a money-getting blog post, you need a landing page. But you should stay away from affiliate-like landing pages that are focused on hijacking someone’s email address.
When you’re blogging, every step that you take is to enhance your brand. Because on the internet, what people say about you is much more important that what you say about yourself.
Build a landing page that can solve a particular problem. For instance, you could create a page that has a useful article on how to install wordpress software.
Beneath the page, you would embed an opt-in box and nudge readers to sign up to access a video tutorial that guides in the installation. It’ll work perfectly because most people prefer to watch a video, rather than read a bulky text.

Step #3: Craft a unique selling proposition

Your readers need to know what you stand for. That’s your unique selling proposition.
And what you can deliver. In a nut shell, they want you to stand out from the crowd, and shine a brighter light on them.
Getting people to opt-in to your list, buy your product and refer others is one of the easiest things to do, but if you don’t know how to do it – you’ll complain.
Look at successful bloggers like Danny Iny, Pat Flynn, Derek Halpern, Darren Rowse and a host of others, what do they’ve in common?
In the sea of thousands of bloggers who are drowning, these dudes have distinguished themselves. Remember that your USP is visible, it’s alive and it can connect with your readers. Take it seriously.

Step #4: Generate viral blog post ideas

All ideas are not created equally. Some ideas will go viral, why the others will sink in oblivion. In order to make money with this post of yours, you’ve to cover a topic that people are excited about.
That way, they’ll share it on Twitter, Facebook, LinkedIn, Pinterest and even cite in on their latest posts.
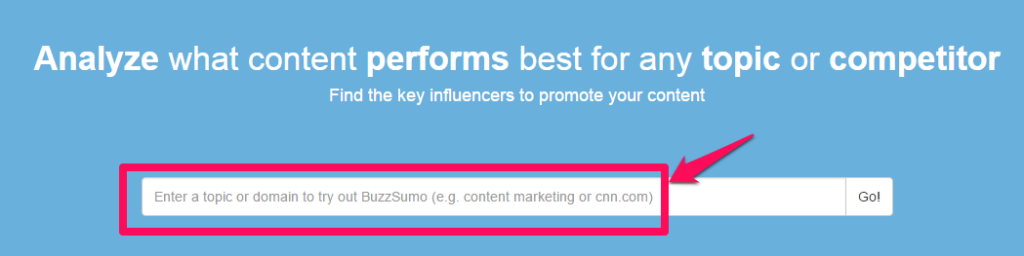
To generate viral post ideas, just visit buzzsumo.com
buzzsumo
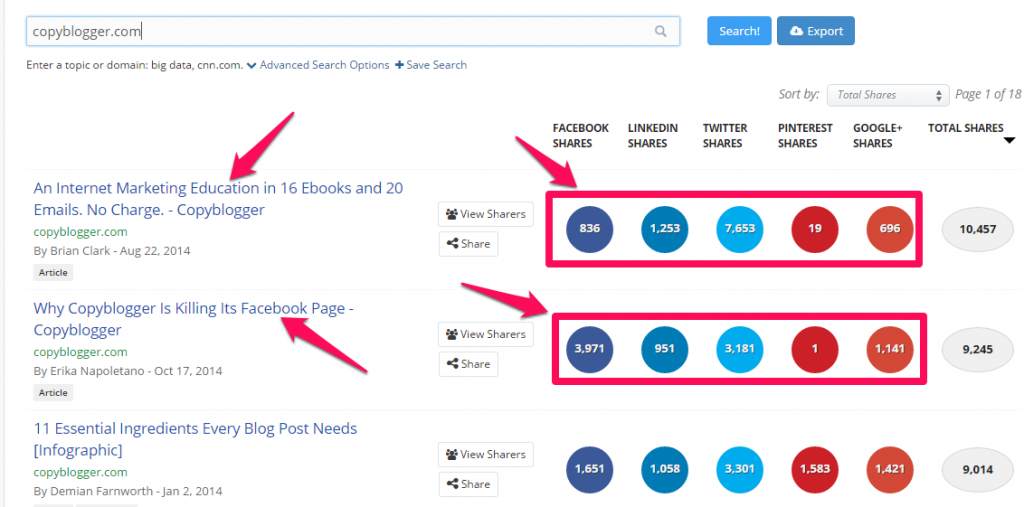
Type in your primary domain name or topic/keyword you wish to write about and hit search. Let’s assume you want to find out Copyblogger’s posts that went viral. Go ahead, type “copyblogger.com” and hit “Go!”
copyblogger viral post

From the screenshot above, you can see that the topics that went viral and got thousands of shares on social media networks are Internet Marketing Education, Facebook Page, Infographic and so on.
Remember that you don’t have to reinvent the wheel. You already have an edge on topics that are hot right now and also evergreen.

Step #5: Connect with power users

Generating an idea that would likely go viral isn’t enough. You also have to connect with people who have the influence, zeal and authority to persuade their fans for you.
You can’t do it all by yourself – especially when you’re new to the game.
However, you’ve to understand how power users operate. Pro bloggers like Jon Morrow, Brian Clark, Chris G. and several others will not promote your post if it’s not useful or at least interesting.
And you don’t have to write text-based content only. Infographics, videos, podcasts and other forms of content would set you on course.
If you’re finding it difficult to create other forms of content, try these free tools: vismepiktochartinfogr.am, and visual.ly. Those are great tools for turning your ideas into a graphic-type post.

Step #6: Target long-tail keywords

Even after Google bots and PBN de-indexing update, long-tail keywords still continue to rank better and generate targeted organic traffic. For your blog posts that will make money, you’ve to target this type of key phrases.
If at this stage you still expect me to advice you on keyword placement, then you’ve to be updated. You haven’t been reading enough, duh?
Anyways, stuffing keywords no longer work, but placing it on the title, as long as it reads fluently and doesn’t look deceptive, you’ll improve your rankings.
Inbound links can never be done away with – use blog outreach and press release to send juicy links to your ‘valuable post.’

Step #7: Monetize post with high-tick offers

The final piece of puzzle is to monetize your post with high-ticket offers.
Such affiliate offers will pay you at least $50/sale. Ideally, promote offers that you can earn up to $100 per sale or lead.
As your powerful blog post gets tweeted, liked on Facebook and stumbled upon by your readers and target audience, a lot of people would like to know more about you, and what products you have. Because they now trust and like you to an extent.
No matter your niche, you can find high-end affiliate offers at offervault and clickbank


How to Earn $50-$100 Daily from Affiliate Marketing?

How to Earn $50-$100 Daily from Affiliate Marketing?


This is almost never shared on web, even the gurus made it a secret. I found it quite few days ago and now sharing it with you. Also I would more posts with awesome information which can work for you to generate money fast and easily with low investment.
May be at start, a $30 would also sound very much for you. But once you’ll start banking profits, they’ll be recovered within a day.
The method I’m gonna share requires a bit of basic skills of monitoring traffic, English writing skills and a bit of patience too.
Also one note you should make that I don’t give any guarantee of profit. You can generate even $1000 a day or $0 per day with this. If you work smart, then you’ll profit for sure. So read it carefully.
Lets start,

What technical setup will you need?

In short, what stuff or services you will need to start this method and earn money?
And that’s it. May be you’ll be introduced to all the above things, or may be some of them are new for you. Don’t worry, I’ll teach you everything, so no need to worry to search on Google.
Before I start explaining the method with you, let me tell the meaning of the requirements, if you are a beginner. I don’t want to make it understandable for pros only, but the real thing is to explain the whole matter to a starter guy to help him making money.
  •  A Blog/Website: If you are a blogger, then you must be knowing meaning of this. ;)
  • What is HTML and CSS: HTML and CSS are languages to create and stylize your webpage as you wish with special effects. You will need basic knowledge of it because you will have to make your design attractive, and catchy, highlighting the call to actions etc.
  • An Email Autoresponder: A service that sends email automatically after one subscribes to your blog and lets you set email courses for specified time. Eg: You want to send 1 email to subscriber for the first 10 days after he subscribes, this service providers let you do it.
If you still have problems, then don’t worry. I’ll show the full process in brief.
So here it is.

The Method To Earn $50-$100 Through Affiliate Marketing

The 100% working method to earn money with affiliate marketing is here. It is so simple and easy with fast and guaranteed results upon your hard work.
First of all, you’ll need a blog. I think most of you already have it. You need a little 100 daily visitors to your blog. If you don’t have a blog, then first create it and write unique articles to generate traffic. Reaching 100 visitors daily isn’t much hard for any of you.
Now create a eBook for your blog. This is the most important factor in this process. You have to create an eBook which is really totally unique. It must attract your readers.
Write an eBook with great information about your niche, which audience all over world wants for FREE.
For doing this, create a very catchy cover and make the title of eBook a bit spicy.
If you can’t write an eBook then you can outsource it from others too. They are many writers available there. It may be a bit expensive. So better you write by your own.
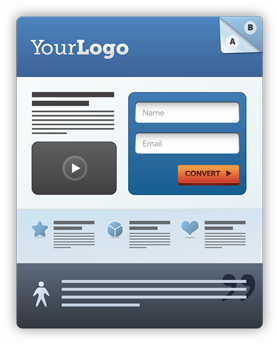
After creating eBook, it’s time to create a landing page for your blog. A landing page is where your visitors lands, and that page attracts the visitor and makes him give his email/buy the ebook/subscribe to your blog etc.
Different landing pages have different proposes to convert. For this process, you need that visitor to provide you his genuine email address. In return you’ll give the report/eBook to him for free.
Create a landing page on your blog’s homepage because most of the visitors land to your homepage. If you don’t know to design landing pages, then here are few helpful links where you can learn to do it. Helpful links:  
landing page design
Once you check out all the above 4 helpful links, you’d get enough information about landing pages. So lets move on.
After that, you’ve to setup an autoresponder. When someone gives his/her email address, the autoresponder will send him a notification to confirm it and the eBook (for what he subscribed).
Once you have built this all things, you’ll need traffic to your landing page. The best way for getting traffic is Guest Posting. Do guest posts on blogs on your niche and in author bio, leave link to your landing page.
Once you got the email address, now you need to convert it to a buyer.
Send them a 7 day course which will teach you something unique in your niche.
For example, if you are blogging about weight loss, send a 7 day course named “The 7-day Plan to lose weight guaranteed”
If your blog is about blogging tips, then send them “How to Make Your Blog More Profitable in 7-days”
The more attractive your headline is, the more attention you will get. :D
In this 7-day course, you need to win the heart of him/her. You need to build relation of trust with them.
So be careful while writing it, it is very very important.
Once you are done writing it, now it’s time to earn some money. You gave them lots of information for free, now you need to earn money from them.
You will help them make the process fast, and help them, and earn money.
Like when you sent a course titled “The 7-day Plan to lose weight guaranteed” promote some products related to losing weight and earn money. When they will trust you, they’ll surely buy it. For finding products related to your niche, you need to sign up at clickbank or amazon associates.
This two are best affiliate networks. I use clickbank most. Amazon associates is also good.
You will get a unique link named affiliate for the product from the affiliate networks. Include it in the email, when the person will buy it via that linked, you’ll earn commission for it.
The best thing is that, you can even get more than the creator of product gets for a sale. This is affiliate marketing.
The secret to generate more profit is getting more traffic and more emails. You can get lots of traffic via guest posting.
This is the method which can generate you $50-$100 on a daily basis.
Privacy Policy |. Powered by Blogger.

Author Details